Window Opens, Heating Stops — A Blueprint for Every Room
The radiator turns off when the window opens and back on when it closes — built as a reusable Blueprint so the next room takes 30 seconds.
The radiator in Louise’s room was running at full heat with the window wide open. She’s almost twenty — keeping her window shut isn’t something that happens reliably. I noticed the window had been open for an hour, heat on, outside temperature around 4°C. Not a disaster, but a predictable waste that would keep repeating.
The fix was a window sensor and one Home Assistant automation. The part I spent an extra hour on was building it as a Blueprint so when the same pattern comes up in another room, it takes 30 seconds, not another afternoon.
Hardware needed: IKEA window sensor + Mill radiator
An IKEA MYGGBETT door/window sensor on Louise’s window (binary_sensor.myggbett_door_window_sensor_door). The radiator is a first-generation Mill unit — climate.louise — which only supports two modes: heat and off. I have the same first-gen model in my office.
The master bedroom and kitchen run newer-gen Mill radiators with more HVAC modes. The Blueprint handles all of them — it snapshots the exact state before turning off and restores it precisely when the window closes, regardless of which mode or temperature the radiator was at.
The living room is a Daikin heat pump controlled by Tado — a different integration with its own modes. That one gets its own approach.
The Mill has a built-in open window detection feature, but it works by sensing temperature drops — slow to react, and it misses short openings completely. The MYGGBETT sensor is instant and precise.

Building the Home Assistant Blueprint
Rather than hardcoding Louise’s entities, I built the logic as a Blueprint at /config/blueprints/automation/homeassistant/window_heating_control.yaml. The inputs are a window sensor, a climate entity, and a configurable delay:
blueprint:
  name: "Window → Heating off"
  domain: automation
  input:
    window_sensor:
      selector:
        entity:
          domain: binary_sensor
          device_class: window
    climate_entity:
      selector:
        entity:
          domain: climate
    delay_minutes:
      default: 1
      selector:
        number:
          min: 0
          max: 10
          unit_of_measurement: min
The automation instance for Louise’s room is three lines:
- alias: "Window → Heating: Louise's room"
  use_blueprint:
    path: homeassistant/window_heating_control.yaml
    input:
      window_sensor: binary_sensor.myggbett_door_window_sensor_door
      climate_entity: climate.louise
      delay_minutes: 1
State snapshot and restore
The Blueprint doesn’t just turn the radiator off — it saves the exact state first using a dynamic scene:
- action: scene.create
  data:
    scene_id: "{{ this.entity_id | replace('automation.', '') }}"
    snapshot_entities:
      - !input climate_entity
- action: climate.set_hvac_mode
  target:
    entity_id: !input climate_entity
  data:
    hvac_mode: "off"
The scene ID is derived from the automation’s own entity ID — unique per instance, no manual naming needed. When the window closes, the Blueprint restores that exact scene:
- action: scene.turn_on
  target:
    entity_id: "scene.{{ this.entity_id | replace('automation.', '') }}"
  continue_on_error: true
This means it restores whatever the radiator was doing — 18°C, 22°C, already off — not just a hardcoded heat mode. The continue_on_error: true handles the edge case where the window closes before the automation has ever fired (no snapshot exists yet).
The 1-minute delay
The for: minutes: !input delay_minutes on the opened trigger is what makes this practical. When the window opens, HA starts an internal countdown. If the window closes before the minute is up, the trigger is cancelled — the automation never fires. A quick airing doesn’t kill the heat.
mode: restart handles the edge case where a closing trigger arrives while an opened-trigger is still counting down. The closing trigger wins immediately and turns the heat back on — no queuing, no race condition.
Notifications
When the heating switches off, two things happen: a push notification goes to all devices via notify.alle_enheder, and a voice announcement plays on the kitchen speaker:
- action: notify.alle_enheder
  data:
    title: "Window open"
    message: "Louise's window has been open for 1 minute — heating is off"
- action: tts.cloud_say
  target:
    entity_id: media_player.hojtaler_kokken
  data:
    message: "Louise's window is open. Heating is off."
    language: da-DK
The dashboard card
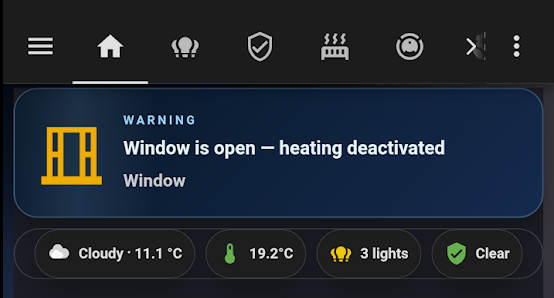
The AlertTicker card (custom:alert-ticker-card) picks up window sensors by device_class: window — no manual entity list needed, so it covers any sensors added later:
type: custom:alert-ticker-card
show_when_clear: true
clear_message: "All windows closed — heating active"
alerts:
  - device_class: window
    state: "on"
    message: "{name} is open — heating may be off"
    theme: window
    priority: 2
When all windows are closed, the card shows a green “all clear” slide. When one is open, it switches to an animated alert with the sensor’s friendly name in the message.
Reusing the Blueprint in other rooms
Settings → Automations → Create → From Blueprint → select “Window → Heating off” → pick the sensor and radiator → save. No new code. That’s the whole point of building it as a Blueprint from the start rather than a hardcoded automation.
The office gets a sensor next — same first-gen Mill, same Blueprint, identical configuration. The master bedroom and kitchen Mill radiators will work too once they have window sensors. The Daikin in the living room is a different story: Tado manages that one and will need its own logic when the time comes.